Repairing Fiberglass Boats
Most fiberglass scratches, dents, and gouges are easily addressed with the proper materials. Even deep gouges that penetrate to the core can be repaired for less than $500 in materials.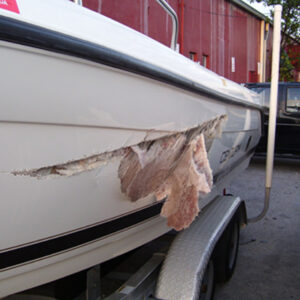
Fiberglass consists of two components: structural fiber and resin. The structural fiber is woven in different patterns and impregnated with polyester or epoxy resins.
If you’ve owned a fiberglass boat long enough, you’re bound to have some scratches, chips, and nicks. These aren’t just unsightly—they can actually cause damage if left unattended.
A fiberglass scratch or gouge can develop into a serious crack in the gel coat if it is not repaired quickly. Fortunately, these types of problems are usually easy to fix at home.
Start by removing any wax or grease from the area with acetone. Then sand the damaged area with 1000-grit wet or dry sandpaper to roughen it up so the resin or filler will adhere to the surface. Wipe down the sanded area with acetone again, and then mask off any areas you don’t want damaged by the epoxy or filler. Now you’re ready to mix and apply your fiberglass repair material. The instructions that come with your chosen product will give you a good idea of the process and what supplies you’ll need.
Once you have your fiberglass paste, pigment, or gelcoat, apply it to the scratch or chip with a plastic spreader. If you used pigment, make sure it matches your boat’s color before applying. Let it set and wet-sand it smooth before polishing it. Now you’re ready to buff and wax your boat again.
If you have a deep scratch or gouge that penetrates through the fiberglass core, you’ll need to do some more extensive work. You’ll need to cut pieces of carbon or glass fiber cloth to shape them, and then use resin to build the area back up. This will probably require a fiberglass patch kit. Once the patch has cured, you can apply a gelcoat and then sand and polish it.
If the damage is too much to fix with a kit, you can always get a professional fiberglasser to help you out. However, it’s also worth attempting to do the job yourself because it can save you some money in the long run. It’s a lot cheaper than replacing your entire fiberglass and gelcoat boat. Plus, putting off the repair will only lead to more costly damage down the road.
Leaks
Leaks are a boat owner’s nightmare. They can cause a day on the water to turn into an emergency rescue mission. It is important to find and repair leaks in fiberglass boats as quickly as possible. This will help prevent a problem that may eventually cause serious and expensive damage to the hull.
Fiberglass is impervious to water and can’t rot. But there are a number of ways that water can enter a fiberglass boat and compromise the wooden structures and flotation foam inside. Several of these are not as obvious as the source of a leak.
One is a crack that looks fine on the outside but is actually letting water in around the keel. A second is a hole caused by a collision with a rock or other object underneath the water. This kind of damage can often be repaired by sanding the area down and then applying new fiberglass cloth and resin.
A third way that water can enter a fiberglass boat is through a stress crack in the keel. This can be caused by a hard bump or by a keel that is supported by too few blocks under it. Eventually, this can cause the fiberglass to delaminate and leak, especially in areas where the keel contacts the water.
If you have a leaking gouge in your fiberglass boat, it is important to get it repaired as soon as possible. This will prevent further damage to the hull and prevent your boat from taking on water.
Depending on the severity of the gouge, you will need to use different types of fiberglass repair materials. In general, these products will be mixed with epoxy to form a thick paste that can then be applied to the damaged area. It is also important to sand the edges of the gouge to eliminate any sharp corners that might have formed, and then apply a gel coat over the area to give it a smooth surface.
When repairing a fiberglass boat that is leaking, it is important to remember that you must be able to see the damage on both sides of the boat. This will make it easier to determine how to repair the damage and whether or not a full reconstruction is needed. Most repairs that are required under the waterline can be done in-water, but long-term fixes will require that the boat be removed from the water so that the outer and inner fiberglass skins as well as the core can be inspected.
Fouling
Any boat owner who’s owned a fiberglass boat for very long has probably dealt with a scratch, gouge, or even hole in the gelcoat. Whether caused by a muffed landing, dropped pliers, or some other mishap, these imperfections can quickly turn into bigger problems if not addressed promptly. The good news is that gelcoat repairs are relatively simple and inexpensive. If you follow a few basic steps, most of these repairs can be made with the supplies in your garage.
First, thoroughly clean the affected area to remove any contaminants that might interfere with your fiberglass repair. Next, lightly sand the damaged area to roughen up the surface and prepare it for the application of fiberglass resin. Once the sanding is complete, you can start repairing the fiberglass with your chosen epoxy resin and hardener. Follow the manufacturer’s application guidelines to get the best results from your repair.
Depending on the severity of the damage, you may have to scarify the surrounding fiberglass to give the new repair material something to adhere to. This is done by grinding an angle in the fiberglass called a “scarf.” Normally, for every 1 unit of thickness of the existing fiberglass, you will need to scarf it away at an angle of 12:1.
The last step in any fiberglass repair is to apply antifouling paint. This helps keep marine organisms such as barnacles, zebra mussels, algae, and weeds from adhering to the surface of your boat. Fouling not only reduces your boat’s speed, but it can also increase the cost of fuel and the time required to clean it.
Blisters are another common problem that can develop in fiberglass boats. These air-filled blisters can let in water and expand to the point where they threaten to delaminate the fiberglass hull. To prevent blisters, try to avoid collisions and overloading the boat, as this can lead to cracks that eventually develop into blisters. Also, regularly clean the entire boat hull to remove any buildup that could cause these blisters. Blisters are usually easy to spot, as they contain a foul liquid that oozes out and can be easily punctured with a screwdriver or chisel.
Blisters
Blisters are a scourge for any fiberglass boat owner. Not as destructive as hull leaks, they are a wake-up call that your pride and joy needs some TLC. Blisters aren’t really a structural problem, but they do look bad, and you need to address them before they grow larger. If the blisters are shallow and not passing through many layers of the hull, then you can fill them with thickened epoxy. If the blisters are deep and are compromising the integrity of the hull, then you will need to do some sanding and gelcoat removal to get at them.
Blistering occurs through a chemical reaction between the water and the polyester resin used to make your fiberglass hull. The resin is fairly permeable, and the gel coat on top is even more so. When the resin is exposed to long-term immersion in water and there are small voids in the hull, water can move into them through osmosis and cause the chemical reaction that creates a blister.
This is not something you can prevent. You can, however, minimize their occurrence. You should haul your boat out of the water more often and keep it dry for as long as possible between trips. Also, if you can find out what caused your boat to develop blisters, you can try to avoid them in the future.
When you do have a blister, your first step is to open it up and let the acidic liquid drain. Do this with a chisel or screwdriver, and wear eye protection. The pressure inside a blister can be double that of a bottle of champagne, and the foul liquid that blasts out is acidic. The next step is to grind the area with a 36-grit disk grinder. It’s best to do this on a plastic sheet. Once the blisters have drained, you can use the same grinder to grind down the weeping areas and remove any damaged gelcoat.